2023 AUG 28
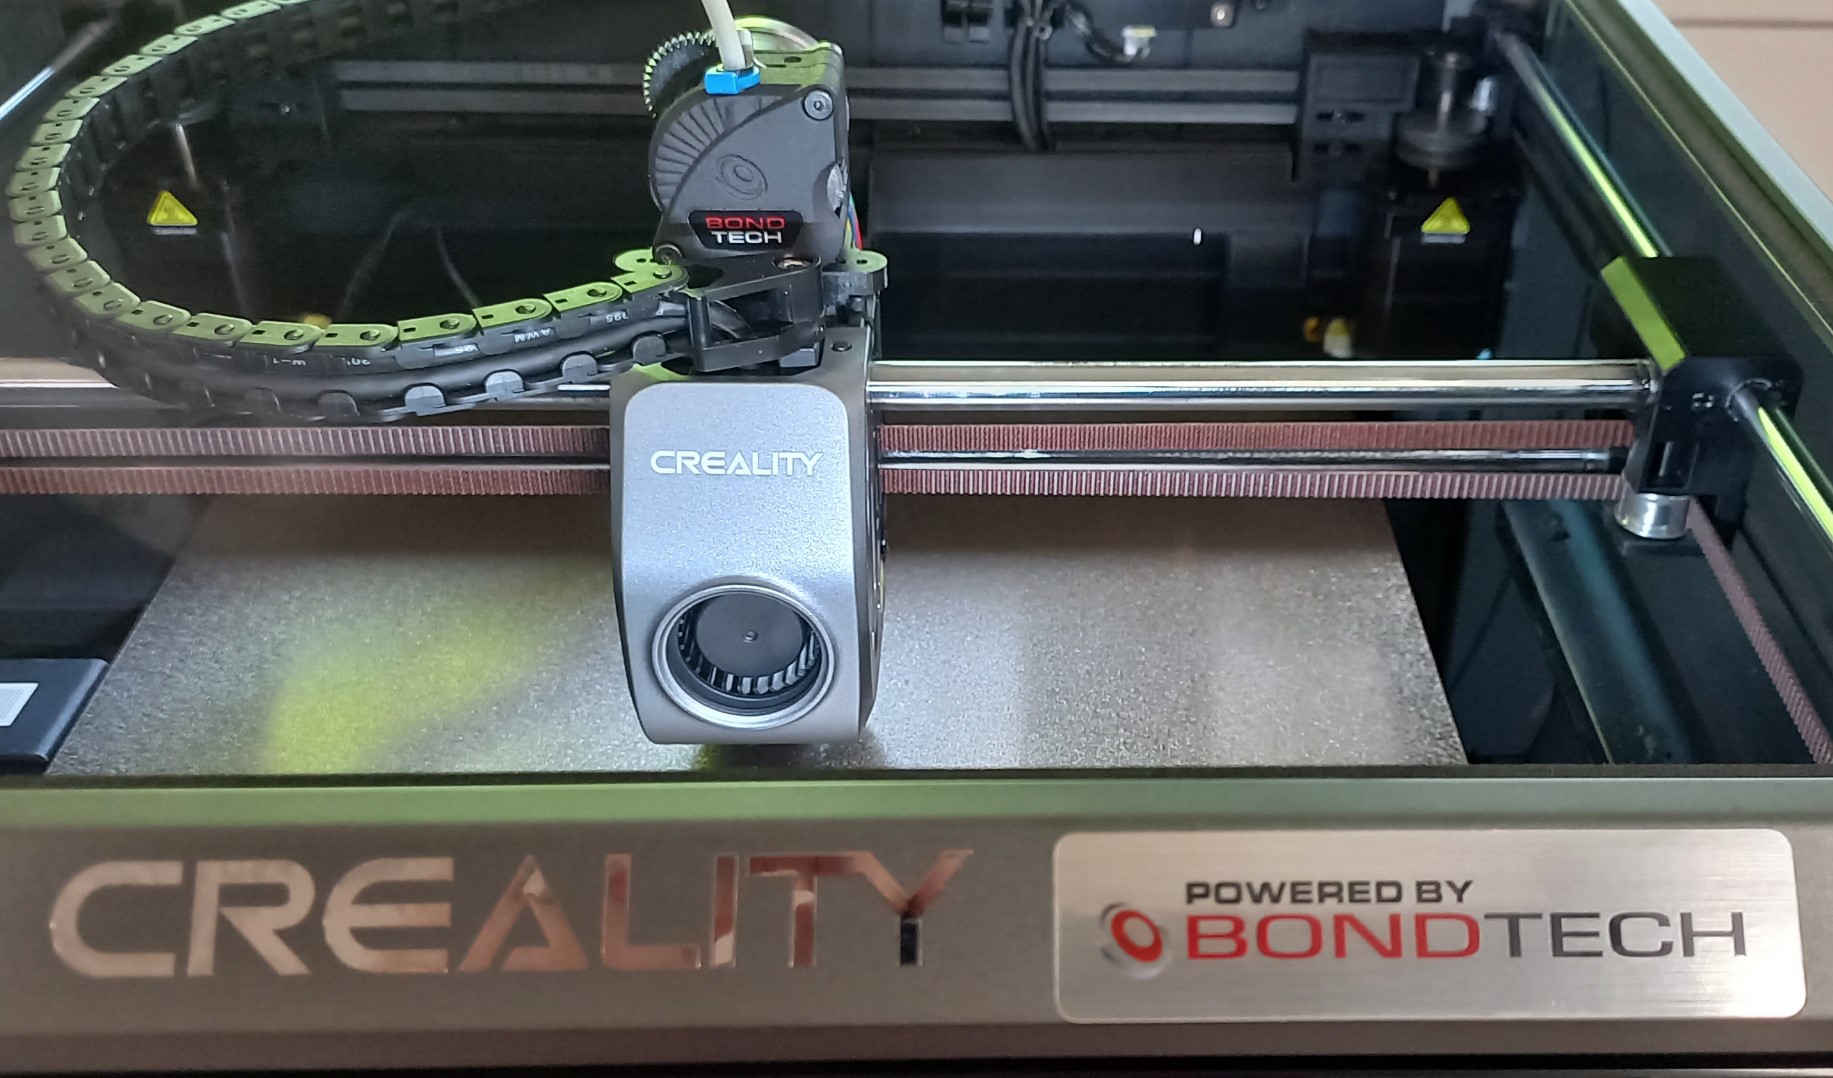
These are my notes on using Bondtech’s LGX Lite extruder on a Creality K1 Max 3D-printer.
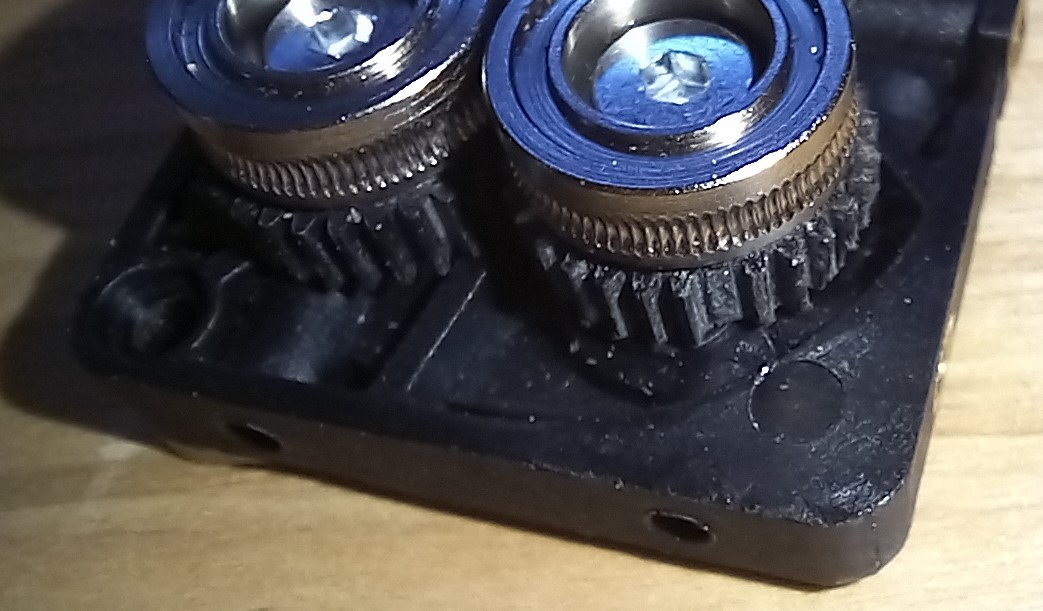
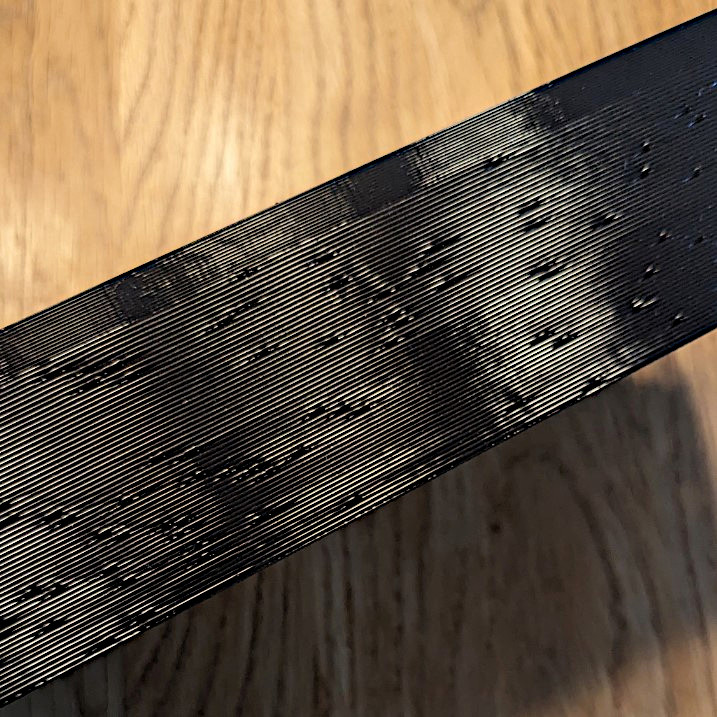
My Creality K1 Max (K1) extruder gave up after only 10 hours of printing. It all started with snagged filament. The filament jumped off the MasterSpool and got tangled in the spool holder. The K1 extruder tried, but could not, feed more filament. Instead of stopping, it proceeded by chewing through its own plastic gears:
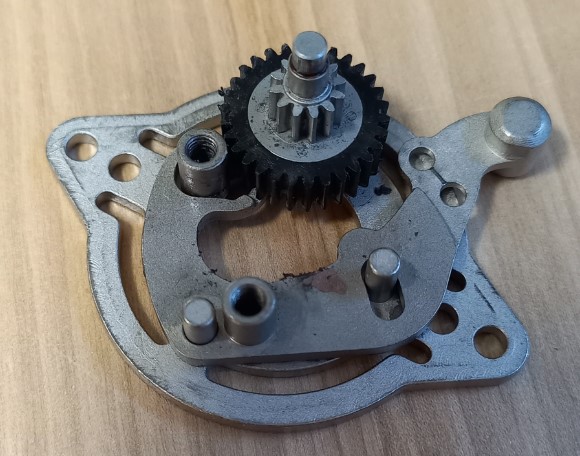
The early K1 printers had bad extruders [1, 2]. Bad extruders are identified by their shiny metal interiors. This is not one of those. This is the supposedly better extruder as evident by its matte finish:
Better or not, the extruder was toast. It could not extrude reliably. A replacement was in order. Using another K1 extruder would likely result in the same issue on the next snag or jam. We need something better. Something battle tested with true engineering prowess.
As of this writing there are no replacement extruders for the K1. Instead, we will have to modify cables, root the machine, fiddle with Klipper configurations, and print adapters, to fit an aftermarket extruder. It is work, but it does leave us with options.
The K1 extruder is strikingly similar to Bondtech’s LGX Lite (LGX) as noted by Nathan Builds Robots. It features large extruder gears, a pancake stepper motor, and a simple lever for setting the tension.
An other option is Orbiter V2.0. It has smaller steel gears and a very interesting filament sensor add-on with a neat unload/load button.
Other notable options:
Update 2023-09-18: The Sherpa Mini and HextrudORT are not suitable. They have no leaver to release the tension, making loading an unloading very difficult.
I went with the LGX extruder because it was widely available on short notice. And because I like the large extruder gears. They seem to produce very smooth and consistent extrusions.
Update 2023-10-25: There is now an official method of obtaining root that doesn’t require special images and hacks.
We need access to Klipper’s configuration if we are to replace the extruder (to modify drive currents, estep values etc.) Unfortunately, this isn’t possible on the default firmware. Creality has decided to cripple Klipper. Fortunately, some very crafty people have figured out how to root the machine. Use the following resources to root your printer:
With a rooted printer you get access to Fluidd which is a very nice web interface for Klipper.
Quick how-to:
http://your-printer-ip:4408/ (replace your-printer-ip with your printer’s IP-address.)Good to know:
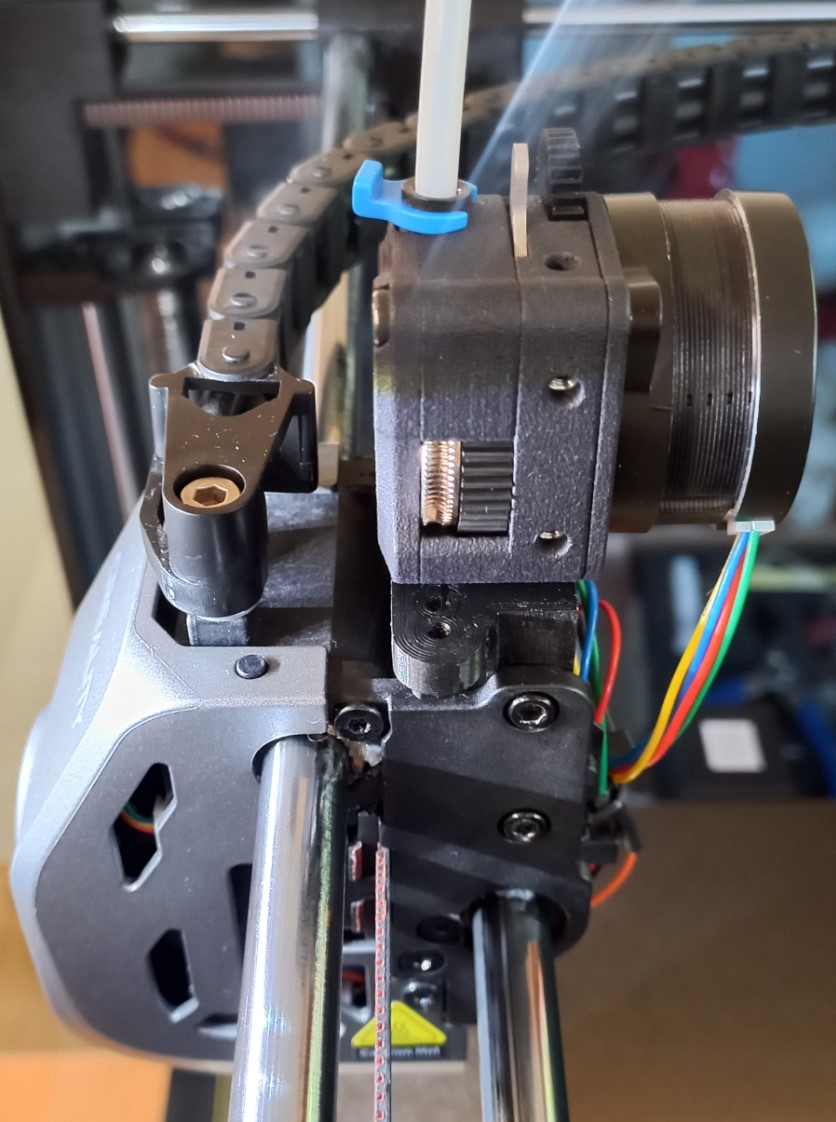
root with password crealityThe LGX is too large to fit where the K1 extruder used to sit. Instead, it goes on top of the print head. Attach it using the Creality K1 Universal Extruder Adapter. This adapter should work for all extruders mentioned above. Re-use the hardware from the old extruder.
Here is an informative video from Nathan Builds Robots with more information.
Use a file to remove any excess plastic that keeps the adapter from seating properly. The two protrusions at the top of the print head kept my adapter from seating. Some light sanding is required.
You need a spare PTFE tube to go inside the adapter. The recommended length is 65 mm.
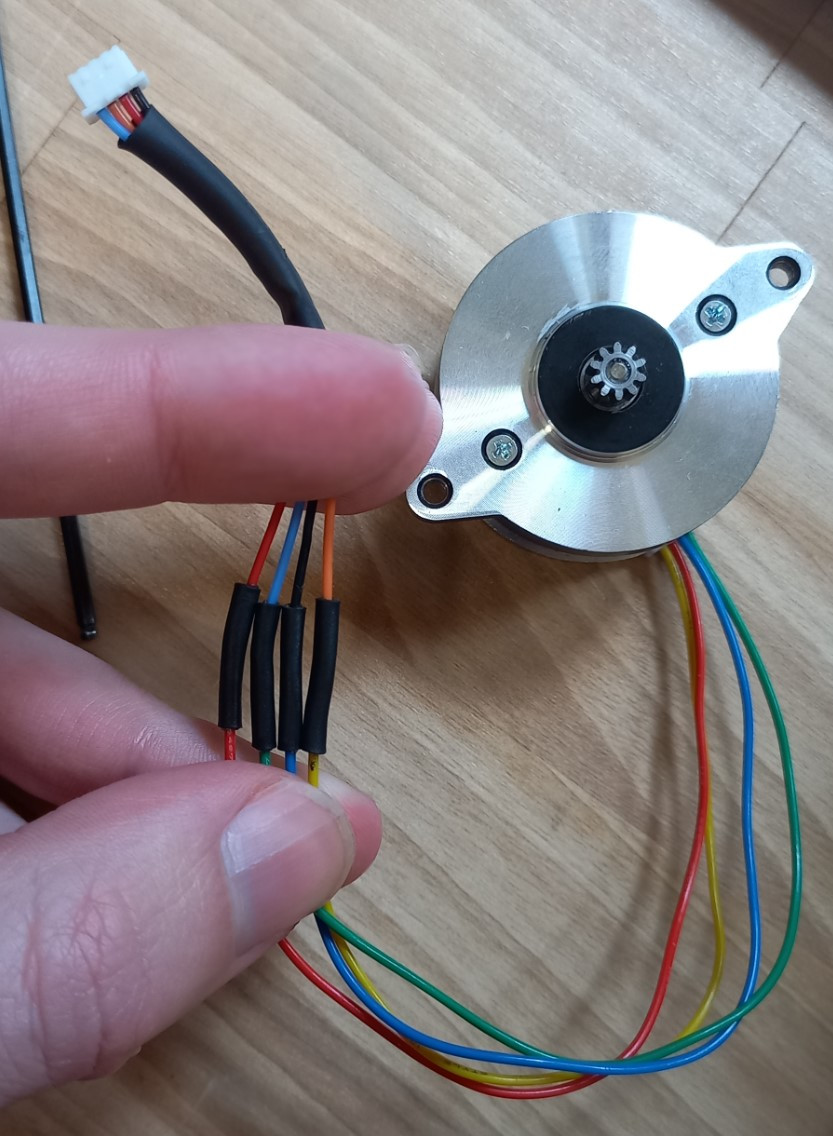
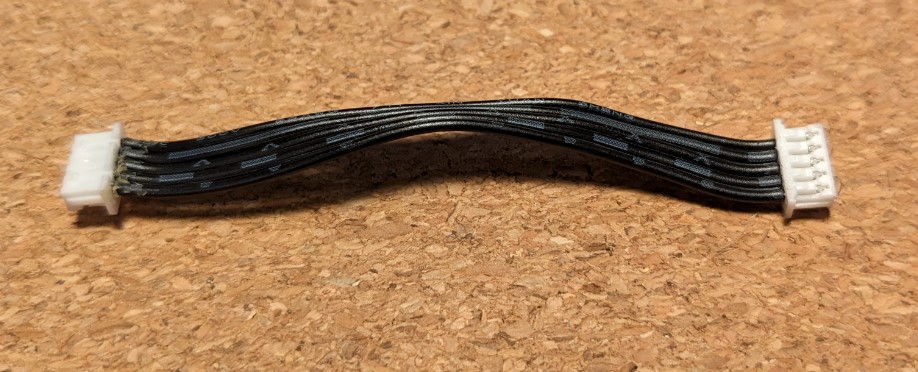
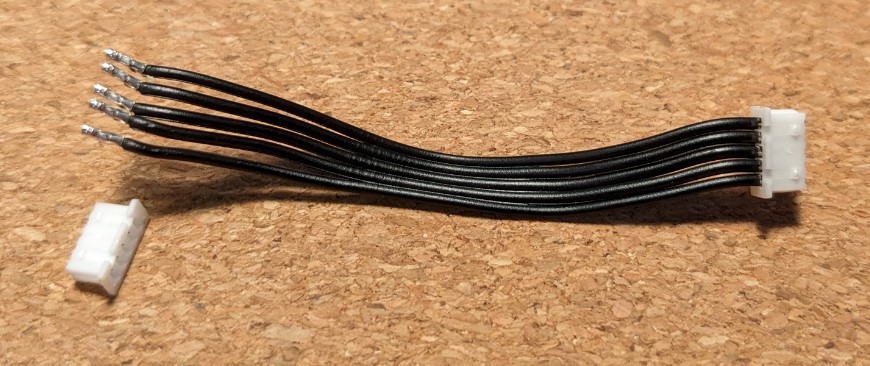
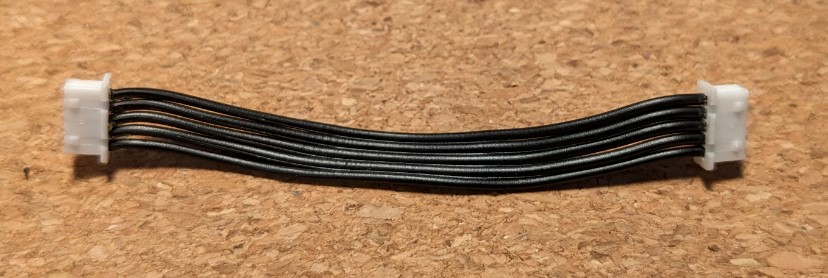
Creality unfortunately went with a Molex PicoBlade connector for their stepper motor. The LGX stepper motor comes with a more standard JST-connector. You can either source some PicoBlade connectors (housing, connector, tool) and crimp them into the LGX motor or use the cable from the original motor. I went with the latter. Here are the connections you need to make:
Remove the PTFE tube from the drag chain.
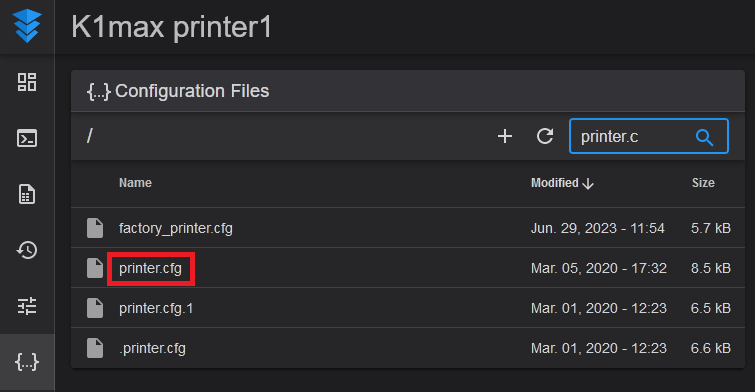
Open the Fluidd web interface of your K1. It should be located on an address similar to http://192.168.0.200:4408. Go to the Configuration page and locate printer.cfg.
Our first modification is reducing the bed size by 6 mm in the Y-direction. This is necessary since the LGX stepper protrudes from the back of the print head. Locate the [stepper_y] section and change position_max:306 to position_max:300. This is the final result:
[stepper_y]
step_pin: PB8
dir_pin: !PB7
enable_pin: !PC3
microsteps: 32
rotation_distance: 72
endstop_pin: tmc2209_stepper_y:virtual_endstop
position_endstop: -2
position_min: -2
position_max: 300 # reduced by 6 mm
homing_speed: 36
homing_retract_dist:0
Our second modification is setting the correct estep value. This setting is called rotation_distance in Klipper. It is found under the [extruder] section. The LGX documentation recommends a value of 5.7:
[extruder]
max_extrude_only_distance: 1000.0
max_extrude_cross_section: 80
step_pin: nozzle_mcu:PB1
dir_pin: nozzle_mcu:PB0
enable_pin: !nozzle_mcu:PB2
microsteps: 16
rotation_distance: 5.7 # LGX recommended value is 5.7
nozzle_diameter: 0.800
filament_diameter: 1.750
heater_pin: nozzle_mcu:PB7
sensor_type: EPCOS 100K B57560G104F
sensor_pin: nozzle_mcu:PA0
pressure_advance: 0.04
pressure_advance_smooth_time: 0.040
control: pid
pid_Kp: 25.013
pid_Ki: 2.566
pid_Kd: 60.966
min_temp: 0
max_temp: 320
Our final modification is reducing the run current and disabling stealthchop. Go to the [tmc2209 extruder] section. The recommended LGX run current is 0.45 A. Change run_current to match. Disable stealthchop to increase torque by setting stealthchop_threshold to 99999 (can we remove this setting to disable it?)
[tmc2209 extruder]
uart_pin: nozzle_mcu:PB11
tx_pin: nozzle_mcu:PB10
uart_address: 3
run_current: 0.45 # recommended LGX run current is 0.45 A
sense_resistor: 0.150
stealthchop_threshold: 999999 # disable stealthchop for more torque
Update 2023-09-29: We should also fix a bug caused by the PAUSE/RESUME macros.
Press Save & Restart to apply the changes. Then wait for Klipper to restart.
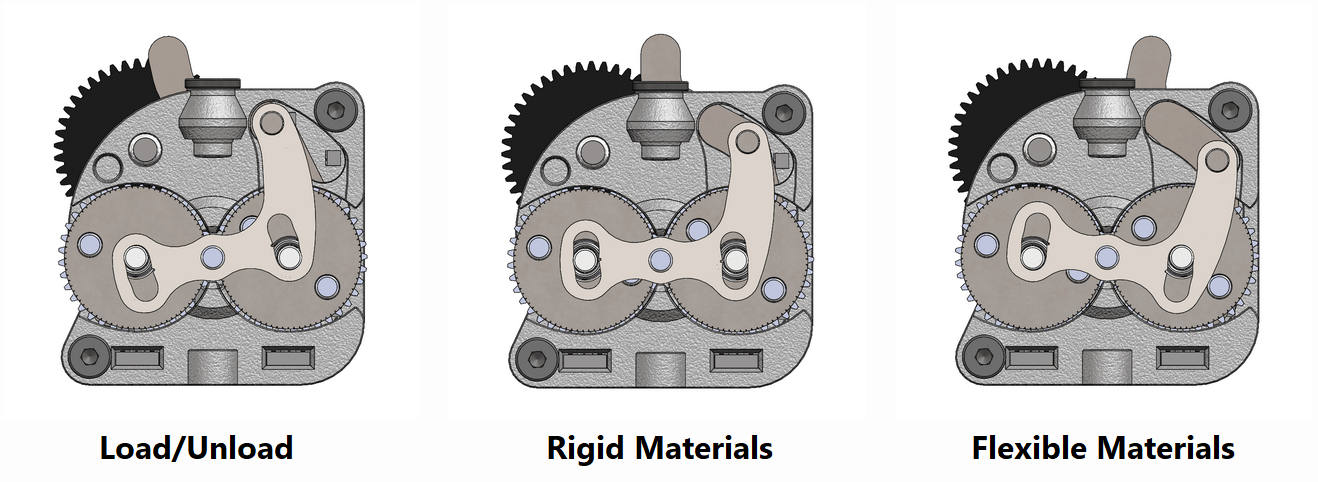
Keep the lever to the left to load/unload filament.
Keep the lever in the middle (aligned with the PTFE tube) when printing PLA/PETG and other rigid materials.
Keep the lever to the right when printing flexible materials.
It is tempting to upgrade the gears to steel. Steel hopefully more wear and heat resistant. However, the increased heat resistance is of negligible importance due to the plastic housing. And unfortunately, it’s a very expensive upgrade at 50 % the cost of a new extruder with motor.
Replacing the K1’s runout sensor with a filament motion sensor is also tempting. A filament motion sensor monitors both the presence of filament and its motion. It allows the printer to stop when jammed. (BigTreeTech SFS V1.0, BigTreeTech SFS V2.0, Marlin/Klipper config)
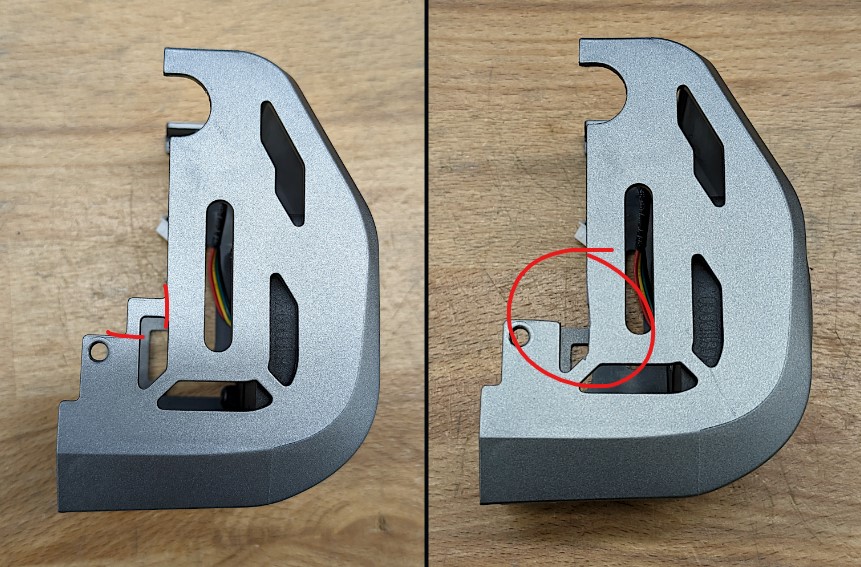
A lighter print head is a better print head. Removing the Lidar is easy since it has no function? But we can make it even lighter by also removing the USB-cable RS232. I suspect the cable only attaches to the Lidar and therefore has no function? Even less when the Lidar is missing. Update 2023-10-10: The cable is an RS232 cable according to the silkscreen on the motherboard. It runs in parallel with the CAN-cable all the way from the motherboard to the print head.
Added 2023-09-29
Removing the default runout sensor is the way to go. Remove the runout sensor but leave the bowden tube press-fit adapter in place. Then run a longer tube from the extruder all the way to the spool. The result is a super smooth filament path from spool to extruder. Magic.
Added 2023-09-29
There is a bug caused by the PAUSE/RESUME macros. The PAUSE macro lowers the extruder run current to a measly 0.25 A. This is great while the printer isn’t moving. But not so great when the run current isn’t reset to the default value. We’ll fix this by resetting the run current to 0.45 A in the START_PRINT macro. Add RESTORE_E_CURRENT to the end of the macro gcode section:
[gcode_macro START_PRINT]
gcode:

    # ... your regular START_PRINT macro goes here ...

    RESTORE_E_CURRENT # use configured run current instead of PAUSE current
This is what reduced extruder current will do to your prints:
Added 2023-09-29
Added 2023-10-25
The Creality K1 Max bed leveling leaves much to be desired. It is a gamble on every print whether or not the first layer is any good.
Instead of relying on Creality’s load-cell approach we are going to use a BLTouch. BLTouch is a tried and true method of probing the bed. It has superior accuracy and repeatability when compared to the stock load-cell approach. And since it relies on an external probe there is zero risk of bad readings caused by old filament clinging to the nozzle.
As a bonus, we can rid ourselves of Creality’s proprietary prtouch_v2 module in Klipper. This module controls the printer’s homing and nozzle cleaning strategy. Both of which are severely lacking. With a BLTouch we unlock the printer, allowing us greater freedom to design our own homing and nozzle cleaning approach.
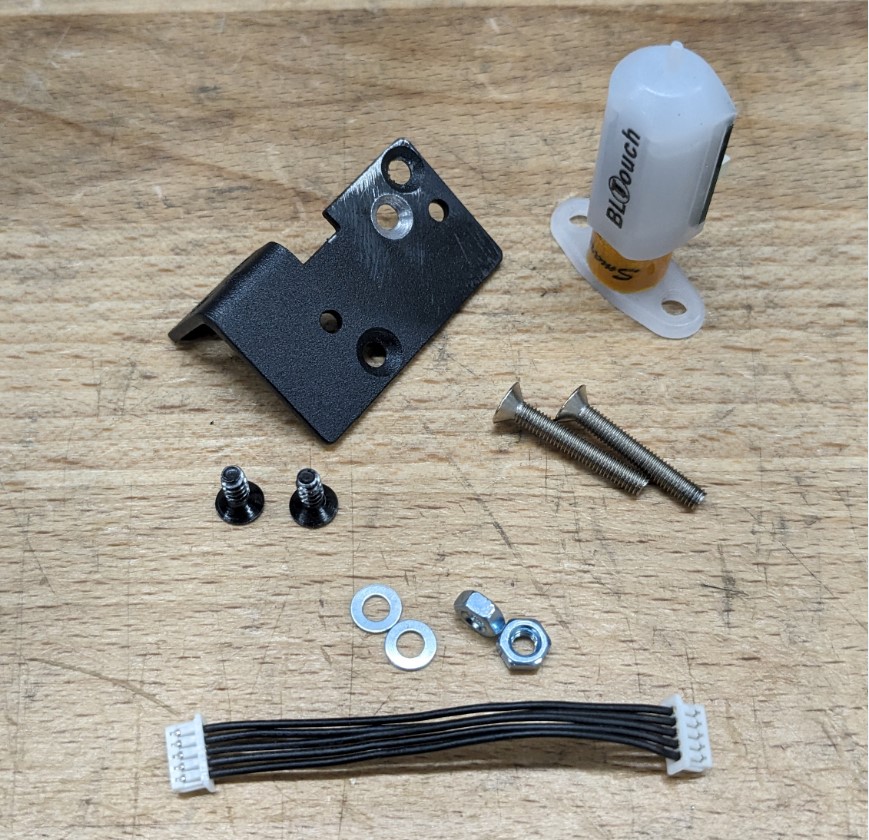
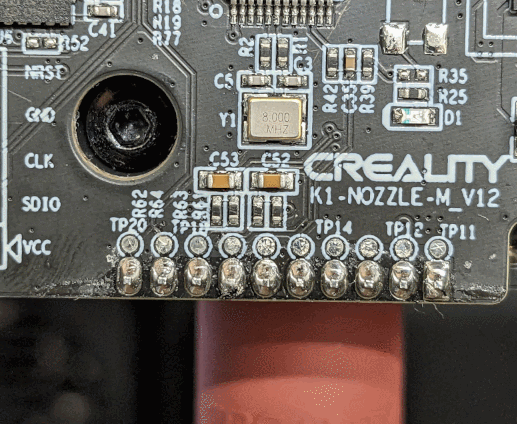
Luckily for us, there is an unused connector on the Nozzle Board B marked Touch. It has a BLTouch compatible pinout:
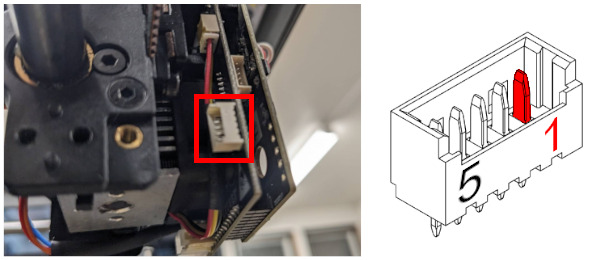
The pinout for the Touch connector is as follows:
Unfortunately, the PA8 and PA9 pins have low-pass filters. BLTouch does not like low-pass filters. We need to remove these later.
This pinout is a perfect match for BLTouch. We can simply connect them thusly:
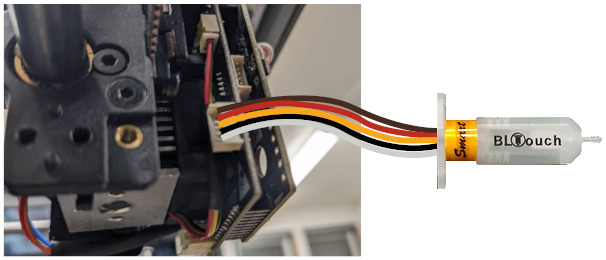
The pinout for the BLTouch connector is as follows:
The “AI” sensor cable is inverted for our purposes. Switch all circuits on one of the receptacles prior to use. Or purchase a brand new Molex cable from DigiKey. They come in 50 mm, 100 mm, and longer.
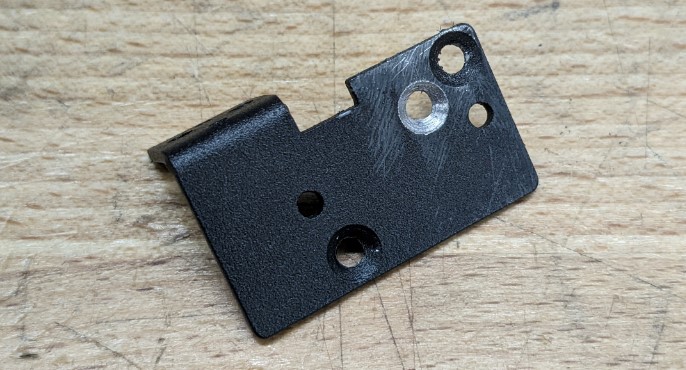
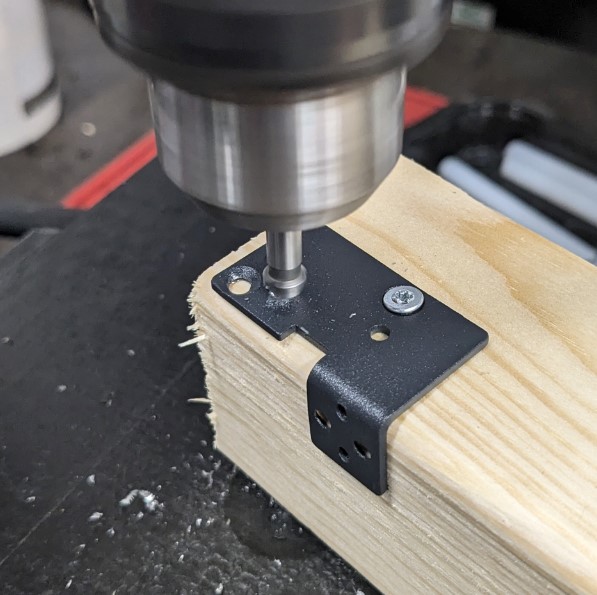
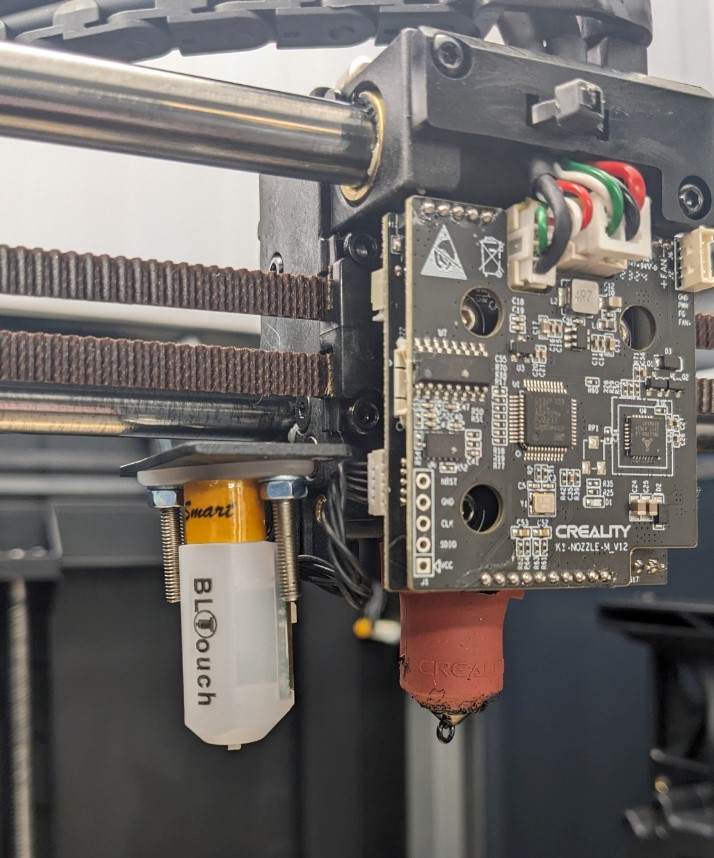
To mount the BLTouch we’ll repurposed the old “AI” metal bracket. It fits perfectly on the print head and underneath the gantry. By drilling a countersunk hole in the metal bracket we can use the BLTouch without loosing bed space! It will fit under the gantry and not collide with anything within the normal print area.
Use the BLTouch as a guide. Attach it to the pre-drilled hole in bottom left corner. Mark where the next hole goes close to the original in the top right. Drill and countersink. We mount the BLTouch at an angle to clear the printer’s frame when at the (0, 0) position.
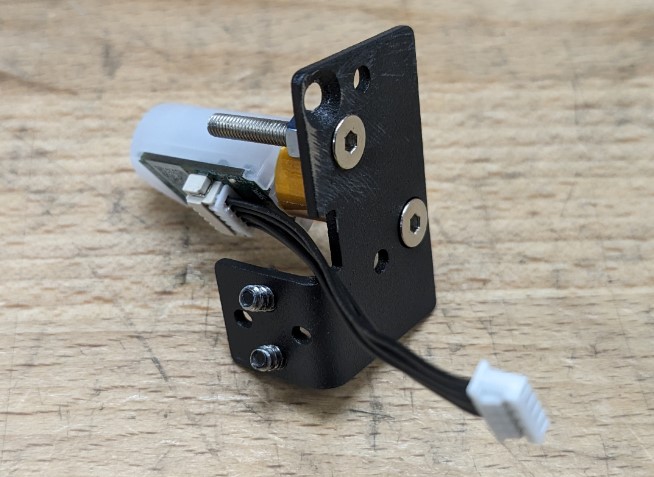
It should look something like this when done:
Use a piece of scrap wood to hold it while drilling the countersunk hole:
Attach the BLTouch with the connector facing towards the print head. We need all the clearance we can get.
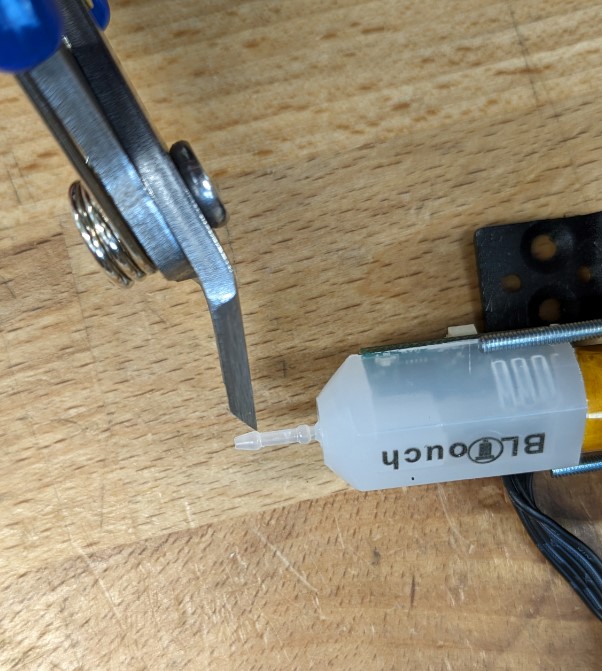
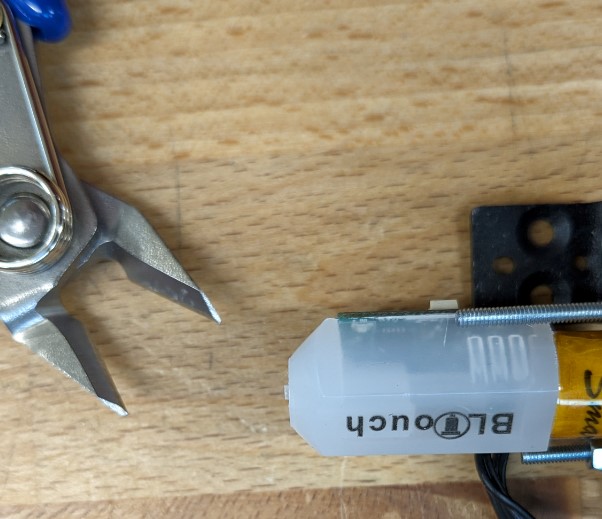
Mounting the BLTouch using the metal bracket puts the BLTouch too far down. There is not enough clearance between the nozzle and the BLTouch tip. This we can fix with a pair of sharp pliers.
NOTE: My printer has a BondTech CHT nozzle. It is shorter than the standard nozzle. It therefore protrudes less, making this a bigger issue on my machine. You might want to skip this step for last, to check if your nozzle is less problematic!
Use flush cutters to cut the tip off:
The fan shroud covers the Touch connector. Which is a problem. Unless, you go for a 100mm cable and route it around on the backside. Which I’ve not verified. We need to modify the fan shroud. Using a hacksaw this is a quick job:
BLTouch does not like low-pass filters. The nozzle board unfortunately has two. One for each pin connected going to the BLTouch. These need to go. Remove C53 and C52:
Note that I took this opportunity to clean the board. It is now better than factory!
We are now ready to mount the BLTouch to the printer.
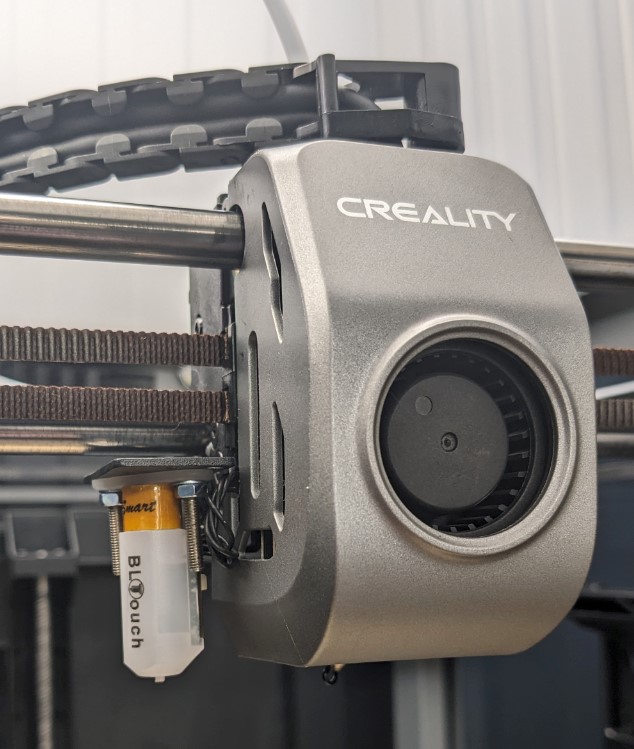
It might seem like it can crash into of the printer’s frame. But this is only a problem when moving the print head manually without power. Once powered and homed, it will not go far enough left and forwards to crash. This is mostly due to the angle of the BLTouch. It matches the printer’s molded plastic in the front left corner.
Start by making a backup of your printer’s Klipper and config files. Perhaps add them to a local Git repository? Copy for safekeeping:
/usr/share/klipper/usr/data/printer_data/configGrab a fresh copy of bltouch.py, homing.py, and probe.py from the Klipper source code repository on GitHub. Copy these files to your printer’s /usr/share/klipper/klippy/extras directory. Overwrite the files that already exist. Then delete their corresponding .pyc files (otherwise they won’t recompile.)
Open printer.cfg.
Remove the entire [prtouch_v2] section 🥳
Enable BLTouch support:
[bltouch]
control_pin: nozzle_mcu:PA8
sensor_pin: ^nozzle_mcu:PA9
x_offset: -38
y_offset: -5
z_offset: 0 # requires calibration!
speed: 1 # increase later
lift_speed: 5 # increase later
Modify [stepper_z] to use the BLTouch as endstop:
[stepper_z]
# ...
endstop_pin: probe:z_virtual_endstop
#position_endstop: 0 # disable since its not compatible anymore
# ...
Modify the [bedmesh] to avoid probing outside the bed:
[bed_mesh]
speed: 50 # increase later
mesh_min: 5, 5
mesh_max: 257, 290 # use 295 - bltouch offset
probe_count: 8, 8
fade_start: 3.0
fade_end: 10.0
algorithm: bicubic
bicubic_tension: 0.1
horizontal_move_z: 12 # reduce after initial calibration
It is prudent but optional to increase the z_safe_g28 value in [gcode_macro PRINTER_PARAM] to 12 mm. Also, increase the minimum Z lift in [gcode_macro _IF_HOME_Z] from 5 to 12 mm.
Remove CX_PRINT_DRAW_ONE_LINE and CX_NOZZLE_CLEAR from your start script. Add instead BED_MESH_CALIBRATE or BED_MESH_PROFILE LOAD="default".
Read the Klipper documentation on BLTouch installation and calibration. Restart Klipper. Test and calibrate the probe.
NOTE: I have no clue what happens if you use the printer’s touch screen at this point. Probably don’t.
After this you might want to remove the other Creality modules such as fan_feedback and custom_macro. After which you might also want to remove references to Creality macros that no longer exist such as CX_PRINT_DRAW_ONE_LINE and CX_PRINT_LEVELING_CALIBRATION. At this point you should also remove references to printer.custom_macro.xx from your macros. You might even want to try the latest version of standard Klipper! Let me know if you do.